
Perfect Last-Minute Gift Idea This Season.
How To Put Iron-On Vinyl On A Hat With The EasyPress Mini post is written by me on behalf of Cricut. The opinions and text are all mine. This post contains affiliate links
With the holiday season peeking around the corner, I bet you’re already brainstorming thoughtful gifts for your loved ones. Well, I’ve got something exciting to share that will sprinkle a touch of uniqueness to your presents – the Cricut EasyPress Mini™! Whether you’re a seasoned DIYer or a newbie in the crafting realm, this nifty gadget is about to become your new best friend. Join me on my first adventure with the EasyPress Mini™ as I dive into creating an eye-catching iron-on vinyl design on a hat. Discover How To Put Iron-On Vinyl On A Hat With The EasyPress Mini and Craft Your Way to Holiday Wonder!
Embarking on a Hat-tastic Journey
I know the jitters that come with trying out something new, especially when it involves turning a simple hat into a work of art. But fear not, because I’m here to walk you through the process step by step. Together, we’ll unveil the magic of the Cricut EasyPress Mini™ and make your crafting experience a breeze.
Crafting Confidence: The Design Stage
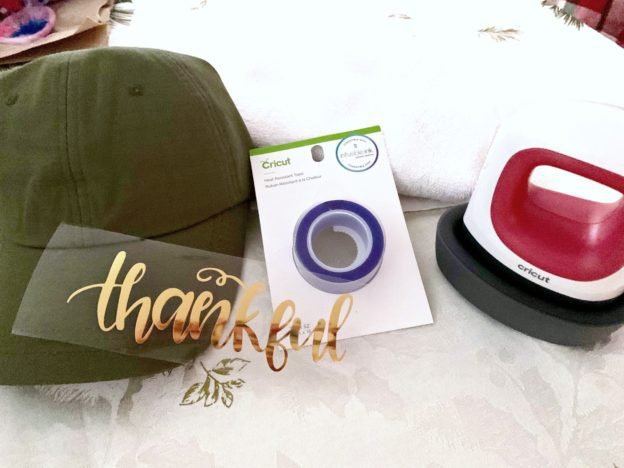
Before diving into the actual iron-on process, let’s talk design. I hopped onto Cricut Design Space™ and found a delightful design that resonated with my vision. Having Cricut Access is a total game-changer since it gives you access to a world of fonts and designs. Once I had the perfect design, I sent it to my trusty Cricut Explore Air™ 3 machine for precision cutting. With the design neatly cut, it was time for the weeding tools to do their magic, removing the excess vinyl and leaving only the masterpiece-to-be.

The Heartwarming Setup
Now comes the exciting part – the hands-on magic with the Cricut EasyPress Mini™. First things first, a touch of heat-resistant tape secured the design in place. Trust me, these designs have a mind of their own, and the tape keeps them from wandering off. While the Mini was getting all warmed up, I checked the Cricut Heat Guide to find the ideal temperature setting. And here’s a tip: The Mini comes to life with an orange light while preheating, and when it’s ready to roll, that light turns a reassuring shade of green.
Let’s pause for a moment to appreciate the sheer cuteness and convenience of the EasyPress Mini™. It fits snugly in your hand, making crafting feel like a delightful playdate. Its compact size makes it the perfect sidekick for petite projects like the one we’re tackling today:
- Headbands
- Small bags
- Bows
- Doll clothes
- Shoes
- Sleeves
- Cuffs
- Other small areas
The Crafting Ballet: Putting it All Together
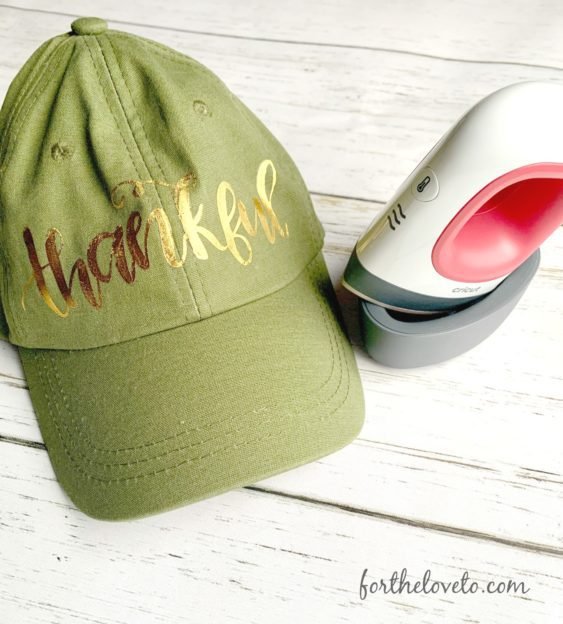
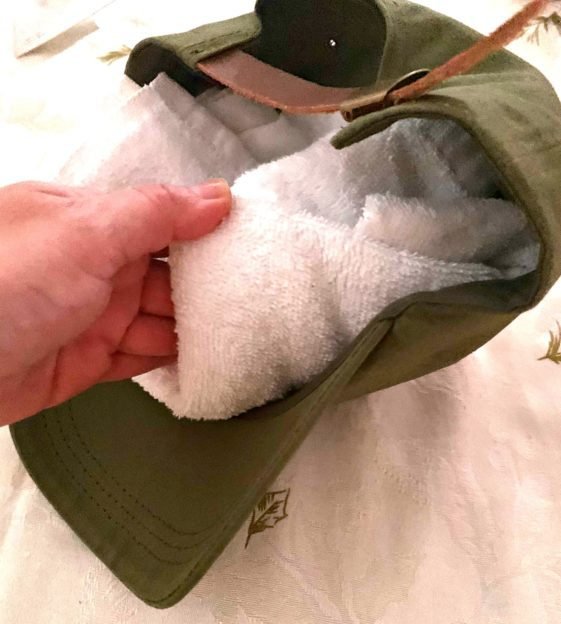
With the EasyPress Mini™ preheated and my design in place, I nestled my hat atop a small hand towel for extra support. Rolling up the towel and placing it beneath the hat helped create a firm base. Gently pressing the hat against the top plate of the EasyPress Mini™, I began applying heat from one side. This little powerhouse made the whole process a breeze – no sweat, just creativity flowing.
And the best part? It’s fast! Within no time, the design was beautifully adhered to the fabric. Though I didn’t peel off the carrier sheet right away, I continued to apply heat for a touch longer. Why, you ask? Well, I was aiming for a rustic, weathered look rather than a crisp finish. And guess what? The result was nothing short of adorable!

Crafting Wonderland: Your Invitation
Feeling inspired yet? I can’t stress enough how the Cricut EasyPress Mini™ adds a dash of magic to your crafting adventures. It’s not just a tool; it’s a companion that transforms ordinary fabrics into personalized masterpieces. So why not join me on this journey of creativity? Whether it’s a hat, a headband, or any petite project, the EasyPress Mini™ is here to lend a helping hand – and a sprinkle of enchantment.
Your Next Craft-venture Awaits
Ready to embark on your own crafting journey with the Cricut EasyPress Mini™? Say goodbye to hesitations and hello to a world of crafting fun. Let’s make this holiday season unforgettable with heartfelt, handmade gifts that speak volumes. Embrace the art of iron-on projects and unveil your inner artist!
So, what are you waiting for? Grab your very own Cricut EasyPress Mini™ and let the crafting magic begin. The only limit is your imagination!
Also read: My First Experience Using Cricut
Thank you for supporting my blog! Please note that this post contains affiliate links, and I may receive payments for clicks, purchases, and/or registrations made through these links. It’s important to mention that ForTheLoveTo.com is a proud participant in the Amazon Services LLC Associates Program, an affiliate advertising program designed to provide a means for sites to earn advertising fees by advertising and linking to Amazon.com. Your support enables me to continue creating valuable content, and I genuinely appreciate it.

Discover more from For The Love To
Subscribe to get the latest posts sent to your email.
Just saw this at your link up party your hat looks great you did a wonderful job #Alittlebitofeverything
Very nice I would love to make my own hats 🧢 looks so fun
Well done looks so good 😊
Love ❤️ this
Great to know about what you can do with this EasyPress
That’s how I feel about you Thankful your super helpful all year long on this outstanding Blog
Just went to order one they are out of stock will be waiting for more to come in so I can order the EasyPress
I love This DIY is so much fun
thanks for sharing
I’m so excited to see this beautiful hat you did I will order this it’s on sale for under 50 dollars thanks for sharing the link for the easy press
This is so cool I’m going to be looking into the cricut-maker love how your hat came out